Wednesday, November 16, 2011
Heavenly Potatoes
Tuesday, November 15, 2011
Sheets in a Pillowcase
Anyways, one of the ideas that I found and tried was the folding sheets and putting them in one of the pillow cases. I have never liked the way a fitted sheet looks when folded. Even if I do all the tricks to make it look like it's flat partner, it just has a messy feel.
So I tried the sheets in pillowcase thing last time I washed my sheets and I have to say, I love it! It looks even better in my linen closet. Also, I don't have to worry if I have all the pieces to the sheet set when I go to make the bed, because they are neatly contained in the pillow case. Thanks Pinterest!!!
Monday, November 14, 2011
Happy 2nd Birthday Madelyn
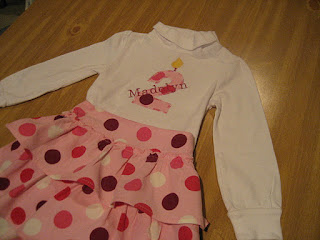
Emily wanted a birthday shirt for Maddy's 2nd birthday which is coming up on Nov. 22. I found a cute skirt on the 75% off rack at The Children's Place that ended up only costing $6.00. I bought two skirts so that I would have one to cut up to use in the applique. Here is her 2 yr. old shirt.
And now the total outfit with the cute corduroy skirt.
I decided to do another shirt that was not personalized so later her baby sister will get to wear it. Also, thought that she would wear the skirt more if it had a neutral shirt to go with it. I also took some extra material and made rosettes for her hair that I hot glued hair clips to them.
Grandchildren Thanksgiving Shirts
Monday, November 7, 2011
Fall Fruit Arrangement
I was asked to bring fresh fruit to a lunch the other day. I decided to be festive and instead of a bowl of fresh fruit, I put them on wooden skewers. I wanted to be fancy so came up with this idea to display the fruit. My original idea was to use a decorative squash to set on top of pitcher with the wooden sticks stuck into it. As you can see in picture, the squash became a part of my fall decoration, as it proved to be too hard to stick the skewers into it. So when that failed, I took a piece of Styrofoam and put it in the top of pitcher.
The only thing I would do different is not to assemble until I got to the lunch location. It proved to be hard to travel in this condition.
Thursday, November 3, 2011
This little journal is the home for the little sweet nothings that I don't want to forget. We have written the long mushy notes that cover pages. :) We have also written the quick, "I love your smile" kind of notes. We have written notes when love has been more of a choice than a feeling and we have written notes when our hearts were so full that it had to spill over somewhere. And I have it all, cataloged for myself when I need to look back and remember where we have been. Because it is good to remember!
Hope you liked this little idea and maybe it will inspire you to create something to remind yourself of the things we really do love about our spouse. :)
Cardboard Castle
For my daughter's princess party I built this box castle. I contacted sears and they gave me two range boxes that I cut the doors and windows out. I used the scraps to make the arch in the front. I covered it all in gray paint and drew on the brick with a black permanent marker. I then had my sister-in-law Elina, who is an artist to paint the vines and flowers on it.
All the girls came dressed as princesses and I had found a princess kit that was 50% off at Walmart. It included 4 tiaras. bracelets, earrings, scepters, and microphones. They all had a blast being princesses and playing in the castle.
Princess Cake
I was just looking at our blog and my daughter Amariah saw that her brother's cake was posted and she wanted to know where hers was. So here it is! For her third birthday we had a princess themed party with castle and all. I just purchased this kit with the doll top and pan. It was really simple to do as I made the flowers in advance with royal frosting. The day before the party I frosted the cake with buttercream, added the flowers and finished off the small details with tip 4.
As you can tell she really loved her Princess cake!
Subscribe to:
Posts (Atom)